A threaded rod, sometimes called all-thread or a stud, is one of those underrated but essential parts in construction, plumbing, and mechanical work. You’ll find it used as a fastener in everything from ceiling mounts to machinery frames. It’s basically a long bolt without a head, and it gives you the flexibility to insert it through holes, attach nuts on both sides, and hold things together tight.
But here’s the thing, most threaded rod comes in lengths way longer than you’ll need. So knowing how to cut threaded rod properly isn’t just helpful, it’s crucial. A rough or crooked cut can damage the threads, make it hard to install a nut, or just look plain sloppy.
That’s where our guide comes in. The BoltCraft team will cover the best tools, tips, and techniques to help you cut threaded rod clean, smooth, and safe, so your project ends with a satisfying spin of the nut, not a frustrating jam.
Key Takeaways
- Threaded rods are versatile fasteners that can be cut to custom lengths for various construction and mechanical applications.
- Always measure precisely and use two nuts to protect and restore threads when making a cut.
- Tools like hacksaws, angle grinders, or reciprocating saws can be used depending on the job size and location.
- Securing the rod in a vise with soft jaws ensures stability and prevents thread damage during cutting.
- Post-cut finishing with a file or chamfer tool is essential for smooth threads and proper nut engagement.
- For clean cuts and dependable fasteners, trust BoltCraft’s high-quality threaded rods and cutting tips.
Understanding the Basics of Threaded Rod
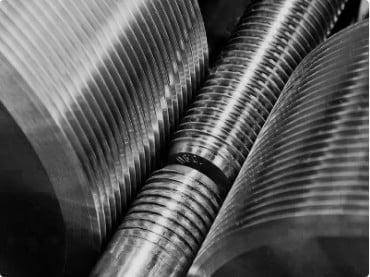
Imagine a long metal rod with screw threads running from end to end. That’s your typical threaded rod. It’s meant to be cut, fit, and inserted wherever a standard bolt just won’t do. They are versatile, dependable, and always worth having on hand. These rods are made in different materials:
- Low Carbon Steel: Strong and budget-friendly. Available in plain or zinc finish
- Stainless steel: More corrosion-resistant and perfect for outdoor installs.
- B7: High Tensile for critical applications
Standard diameters are 1/4″ through 1”, and you’ll find coarse or fine threads depending on the application. When choosing a threaded rod, make sure your nuts match the thread pitch of rod you are using..
Tools and Materials You’ll Need
Essential Tools
Before you dive into the cutting process, let’s talk about gear. Cutting threaded rod isn’t difficult, but doing it right takes the right tools and a little patience.
- Measuring Tape: Get the exact length you need. Don’t eyeball it.
- Marker or Chalk: Mark your cut point clearly, it’s easy to overshoot or misplace the blade if you’re rushing.
- Cutting Tools: Choose based on your job and comfort level:
- Hacksaw: Slow but precise. The teeth on the blade grip the threads, but it takes a steady hand and some muscle.
- Angle Grinder (with a metal cutting disc): Fast, aggressive, and efficient. If you’ve got a lot to do, this grinder is your best friend.
- Reciprocating Saw: Great when you’re on-site or cutting in tight corners.
Support and Finishing Tools
What’s worse than a rough cut? A bent or damaged thread that ruins threading the nut on. Let’s prevent that with the right support:
- Vise with Soft Jaws (or a padded vice): Secure your rod firmly in place. The vice keeps the rod steady while you cut, and the padding helps avoid damage to the threads.
- Two Nuts: This old trick is golden. Thread two nuts onto the rod, tighten them against each other near the mark. They protect the threads during the cut and help restore them when you unscrew them later.
- File or Chamfer Tool: After cutting, the edge will be sharp and rough. Use a file to deburr and dress the end so you can easily insert a nut. A small chamfer makes a nice finishing touch.
Getting a clean cut on a threaded rod is more than just slicing metal, it’s about doing it right. When you follow the proper process, you avoid frustration, wasted material, and damaged threads.
Preparing to Cut: Key Setup Steps
Measure and Mark the Cut Location
Before you even think about grabbing a blade, slow down and measure. Seriously, don’t just eyeball it. Use your tape measure to find the exact length you want the threaded rod to be. Then grab a permanent marker and make a clear, visible mark across the rod where you’ll make the cut.
That mark becomes your guide for everything that follows in this process. And don’t skip the double-check. If you cut the rod too short, even by a fraction, you might be tossing out a perfectly good piece of metal. In real-world jobs, wasted time and material add up. Measure twice, cut once.
Add Two Nuts to the Rod
Next up, thread two nuts onto the rod. Make sure they pass your mark and sit on the section you plan to keep. These two nuts aren’t just there for show.
They serve double duty: first, they shield the threads near the cut from potential damage, and second, they act like a threading die when you unscrew them later, restoring any banged-up threads as they spin off. It’s a smart, simple trick that makes it easier to insert a nut or fastener when the job’s done. If you’ve ever struggled to get a nut started on a burred thread, you know how valuable this step is.
Lock the Nuts Together
Now it’s time to lock those two nuts in place. Grab two wrenches and tighten the nuts against each other, this is what we call jamming them. Once tight, they essentially form a strong shoulder that stabilizes the threaded rod during the cut.
This not only keeps the rod from spinning or shifting but also protects the threads you’ll need later. Whether you’re cutting a bolt for a custom fixture or shortening threaded rod for a structural insert, this jammed pair gives you the stability to cut confidently and cleanly.
Secure the Rod for Cutting
At this stage, you’ll want to secure the rod in a solid vise, or vice, depending on your spelling preference. Either way, place it so your cut mark is sticking out far enough to work with, but not so much that it’ll wobble under pressure.
If you’re dealing with finished threads or painted fasteners, drop in some soft jaws, cloth, or padding to prevent thread damage. And if your rod is long, balance it out so the weight doesn’t create an awkward angle. The last thing you need is your rod dipping just as your blade hits metal. Make sure your mark is still visible and easy to access. If it’s not, reposition the piece.
Step-by-Step: Threaded Rod Cutting Instructions
Make the Cut
With everything secure and your tool in hand, align the blade with your mark. Start slow. Whether you’re using a hacksaw, angle grinder, or reciprocating saw, let the teeth of the blade do the work. Don’t rush, don’t force it.
Keep your hand steady and your body braced. Use smooth strokes or controlled pressure depending on your tool. You’re trying to cut through metal threads here, not chop firewood.
If you’re using a power tool, be mindful of heat. That rod heats up fast, especially with a grinder or drill bit involved. Overheating can discolor the rod or even warp it near the threads.
Tips for a Clean Cut
Let’s bring it all home with a few practical, field-tested tips:
- Always use a sharp blade or a fresh disc. A dull edge doesn’t just slow you down, it can ruin the cut.
- Go slow with a grinder or power tool to avoid overheating. Letting the metal cool between passes helps prevent thread damage.
- Use a file or bench grinder to dress the cut end after slicing, especially if burrs are visible. You can also chamfer the shoulder for easier nut starts.
- Once you’ve made your cut, simply unscrew the two nuts. They’ll clean out the threads on their way off, giving you a smooth, deburred finish that’s ready for use.
No matter your setup, garage project, field repair, or shop job, knowing how to cut threaded rod properly makes all the difference. With the right prep, the right tool, and a few smart tips, you can go from raw stock to ready-to-install fastener in just minutes. And the best part? No ruined threads, no wasted parts, just a clean, nice-looking piece that fits perfectly into place.
Post-Cut Finishing Steps: How to Cut Threaded Rod Cleanly and Safely
Every time you cut threaded rod, whether with a hacksaw, angle grinder, or drill attachment, the blade leaves sharp burrs, jagged threads, and uneven edges. This is where your skill really shows. A clean, deburred end means your nut, bolt, or any other insert will go on smoothly without causing damage.
Here’s how to handle it. First, secure the piece in a vise so it doesn’t move. Then grab a file, grinder, or bench grinder and dress the end until it’s smooth. If you’re working by hand, work the teeth of your tool evenly around the shoulder of the rod. For a quicker finish, you can even use a bit on a drill or a fine grinder wheel.
And don’t forget to chamfer. By giving the edge a slight angle, you prevent cross-threading, shorten your prep time, and make it much easier to insert a nut later. It’s a small hack, but it’s a perfect example of how a little extra effort makes the process smoother.
Understanding How To Cut Threaded Rod
At the end of the day, knowing how to cut threaded rod properly is about attention to detail. From prepping with two nuts, to taking the time to file, chamfer, and unscrew carefully, each step helps you avoid damage and ensures your threads are ready for action.
So whether you’re trimming a long rod for a construction project, shortening a fastener for a tight hole, or just testing your skills with a hacksaw and grinder, remember these steps. A clean, deburred end isn’t just nicer to look at, it’s the difference between a perfect fit and a wasted part. Take the time now, and your future self will thank you for the perfect cut. And if you’re looking for high-quality threaded rods and fastening products? BoltCraft has your back, just contact us if you need any help.